Friday, May 13, 2016


Come join our Facebook Group and complete the Sew Along (from beginning to end) with video tutorials and photographs for the Tuck N Roll Bag (we finally finished!).  You can join our Closed Group at:

Beaser Bags Pattern Group

Please share pictures of your bags with us and connect by telling us about yourself.

I also have a pattern tester group if you are a designer looking for great testers, or a professional tester looking for testing opportunities on Facebook.  Please search for our group to apply for membership:

Sewing Pattern Testers

Wednesday, July 22, 2015

4.      OPEN POCKET

Since the ring ties are optional, we will come back to those. 

Today, we will work on the Open Pocket.  The Open Pocket is the top pocket which comprises the pocket panel on the inside of the bag.  It has no closure and is great to store bulky items while hanging the bag from the d- or square ring. 


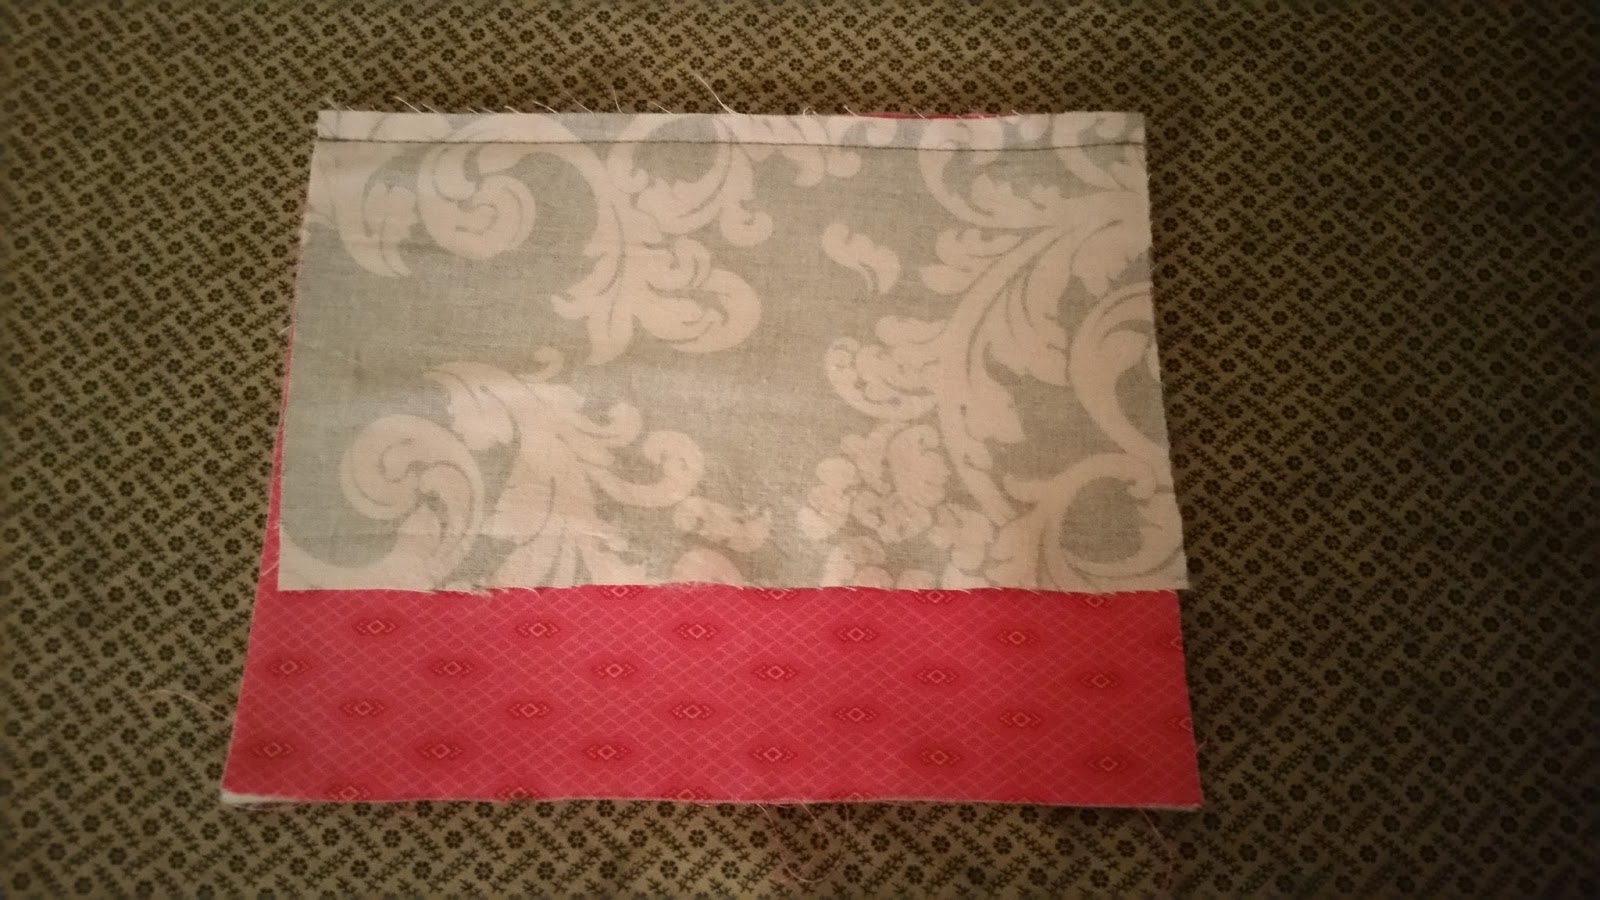
To begin, make sure your open pocket and open pocket lining pieces are pressed well.  With RIGHT SIDES TOGETHER,  pin along the top edge of the pocket.  Notice your pocket will be longer than your lining.  Stitch along top edge.


Press stitching.  This ensures that stitching will “set”.


         Open out pocket/pocket lining and press flat.


With WRONG sides together, bring raw edges of bottom pocket and pocket lining together.  This creates a decorative top edge or strip.   


          “Stitch in the ditch.” 


           Also, top stitch the decorative strip.


Trim raw edges if needed.


STEP 4 IS COMPLETE!

Hope you are enjoying this project so far.  Tomorrow will be a little bit daunting, but not to worry!  Working with zippers is fun.  Read through Step 5.  Hopefully, I will be able to do a video for Step 5 and 6, along with a tutorial to help with those confusing areas.

Tuesday, July 21, 2015

2.         D-RING TAB

You can customize the width of the D-Ring tab to custom fit your larger or smaller D-Ring.  I have had customers ask for a larger square ring to hang on hangers for cruise ship cabins (because of the space limitations).

To do this, measure the inside width of the hardware (D-Ring or Square Ring).  Cut the width of your fabric 4 times wider.  This will give you the perfect fit for any size hardware EVERY TIME!


You can also make the D-Ring Tab shorter or longer, if you prefer.

Fold from top raw edge to center press line, wrong sides together. PRESS AGAIN.


Press WRONG sides together meeting raw edges.  Fold raw edges toward middle (press line) and press.


Stitch along the two pressed edges (clean edges).  Slip metal hardware onto tab.


Meet raw edges of tab together and stitch a ¼” seam at raw ends so that hardware is locked onto tab.


STEP 2 IS COMPLETE!

Monday, July 20, 2015

SEW ALONG—Tuck N Roll Bag

Step 1—Wrap Around Strap
Press the long strip of fabric. 


With RIGHT sides together, press raw edges together creating a long narrow strip. 


Stitch along long side using a ¼” seam allowance.  (See Tips Section below to cut wide of strap specifically for the width of your hardware) 


Using a tube turner and following tube turner directions, load fabric tube onto tube turner.  


Carefully start turning fabric tube end inside out onto tube turner.  Sometimes, serger tweezers are helpful in getting the tube started. 


Carefully turn fabric tube right side out. 


Press seam flat, then press seam to side. 


Lay one raw end on top of the other and stitch together.  Set aside.


Tips:  You can piece together the length of fabric by stitching two shorter pieces of fabric together. Using a fabric pencil, draw a diagonal line from corner to corner of the two pieces of fabric.  See sample below.  Stitch along line. 


Open out and press.  


Trim excess. 


Press fabric strip to ready for stitching.


To customize width of strap, measure hardware; cut fabric  4 times the width of hardware width. 

STEP 1 IS COMPLETE!


Friday, July 17, 2015

Tuck N Roll Sew-Along


We will begin the sew along on Monday, July 20th.  To participate, purchase your pattern at Craftsy.com or beaserbags.com.  You will also need your fabrics and notions.  We will do a step-by-step sew-along, following the pattern, via video and/or tutorial fashion with pictures, tips/hints, etc.  This is an advanced pattern, but anyone who can sew a straight stitch can follow along and complete this project with professional results.

Once  you have your pattern and supplies, follow the cutting instructions for the paper pieces, tape any paper pattern pieces together according to the directions, and cut out your fabrics and fusibles (LABEL your fabric pieces to save time while sewing).  FUSE your fusible pieces to the WRONG side of the corresponding and correct fabric pieces (refer to the pattern instructions).

Fill 4 or 5 bobbins with thread, insert a fresh needle into your machine, and thread your machine.  Have your supplies and tools neatly arranged in your sewing area, and stack your LABELED cut fabric pieces in the order that they will be sewn (refer to your pattern) from top to bottom.

Remove your zippers from the packaging, and carefully press them (see pattern for tips on how to do this).

We will NOT complete this sew along in one day.  This sew along will be done one step at a time so that beginners do not get overwhelmed.  Expected completion date for this sew along is July 31st.  (There are 13 steps in the pattern—we will complete the sew along in 12 days--give or take a few days).  I am breaking the steps down individually so that everyone will be able complete the project in a stress-free and relaxed (and non-rushed) fashion.


Meet me back here on Monday with a cup of coffee and supplies to start sewing the Tuck N Roll Bag!  See you soon!

Thursday, July 9, 2015

Join us for a Tuck N Roll Sew-Along!  We will post pictures, videos, and tips on how to make a professional and absolutely “must-have” bag.  This pattern can be a bit daunting.  However, I am here to help.  We will take our time, and sew this pattern one step at a time—from putting the pattern together, to rolling up the finished bag.  The sew along will begin here at the blog on Monday, July 20, 2015.  Grab your pattern at beaserbags.com  or in my Craftsy shop http://www.craftsy.com/pattern/sewing/accessory/tuck-n-roll-jewelry-bag/123735 and shop for your supplies (either in your stash or visit your fabric store), and meet me back here on July 20 to begin making this versatile and fun bag.  You will want to make one for yourself (for your summer vacation) and several for the holidays.


Wednesday, May 27, 2015

My web designer, Alice Wack, is working fast and furious on getting our web page up and running.  You will be able to shop for patterns, order custom made bags, read blog posts, and learn great sewing techniques there.  Get ready for beaserbags.com coming soon! 

Thursday, May 21, 2015

Come join our Facebook group to get tips and hints on our patterns, and to share your projects.

https://www.facebook.com/groups/405191459643599/

Please direct any questions or problems to:  beaserbags@gmail.com.


Customize a Key Fob or Wrist Strap for Any Size Hardware!

There are so many options when it comes to selecting swivel clips.   Swivel clips are known by many names:  lobster claps, spring hooks, bolt snaps, etc.  These clips are typically used for wristlet straps or key fobs and can be purchased in a wide variety of sizes, styles and metal finishings/colors.   Whatever you call them, there is a great way to customize your project for a perfect fit EVERY TIME!  You can also spray paint your hardware  for adding more interest to your projects.

Here’s a great website with various types of hardware (they also have great prices for ordering in bulk):


First of all, grab your free pattern in my Craftsy shop for the wrist strap and key fob here:


Once you have these in hand, review the pattern instructions.  And now you are ready to customize your project!


Instructions
Measure the width of your hardware at the widest point.  If you’d like your fabric to fit more snuggly in the hardware, take into account this measurement.

 Multiply this width by 4.

Using a rotary cutter, mat and grid ruler (and using all proper safety precautions), cut this width by the length you’d like your finished strap (CUT ON THE FOLD FOR THE LENGTH).

Follow the FREE pattern instructions for pressing fabric to prepare  your fob/strap.  Before sewing, test your measurements by slipping the fabric onto the hardware BEFORE sewing.  Trim and repress is needed.

THE FREE Key Fob and Wrist Strap pattern and instructions  can be found in my Craftsy Shop or at beaserbags.com.


Thursday, May 7, 2015

ORGANIZATION TOOLS FOR  YOUR SEWING ROOM

The most frustrating thing in my sewing room is looking for stuff.   Sometimes, it is necessary to have an afternoon to spend re-organizing my sewing room (drawers, binders, etc.) so that I can have several serene sewing weeks ahead.  Since I am a messy seamstress, it it common to do this often—time consuming but well-worth the effort.

I have outlined some of my favorite sewing room organizing tactics and how to use them for maximum efficiency.  Hope these help you, also.

There are so many things can be used in the sewing room that are made for the garage, kitchen, and bathroom.

Three-ring binder with clear plastic pockets, plastic zippered pockets, tabbed sections, sticky notes, and writing paper:
*My number one tool for good reason!  I keep all of my patterns organized in my binders.  I have several of these binders.  I keep some with patterns that I have used in the past and plan to use in the future.  I have one for projects that I am working on now, or will work on soon.  I used the divider tabs to organize types of patterns, such as bags, baby items, gifts, apparel, etc.  I keep commercial envelope patterns in the zippered plastic pockets, as well as cut pattern pieces from pdf patterns (paperclip the pieces together).  You can either 3-hole punch your pdf patterns or slip each into its own clear plastic pocket (along with the cut pattern pieces).  I keep sticky notes handy to write notes on patterns (changes I would make next time I sew that item, a list of people to sew the item for, etc.).  Keep some writing paper in place of or in addition to sticky notes.

Three-ring hole punch
*To punch holes in your pdf patterns and tutorials

Small plastic containers with lids  
*These are great for storing small items you want to keep separate:  your presser feet, D-rings/hardware, etc.  Wal-Mart sells the condiment cups and small Gladware, both of which have snap on lids which are perfect for these items.  You can also purchase the small cups with lids at stores such as Dollar Tree, Dollar General, etc. They are super inexpensive and very handy.

Day Planner (with a small legal pad, calendar, pockets, etc.) 
*I plan and calendar projects for gifts, and when I know I will have more time than usual (bad weather, holidays, etc.).  I have a small legal pad in my planner for a sewing shopping list, along with coupons for store trips to save gas and running around (more time for sewing!)  I have a zipper pocket to keep my store receipts handy.

Image result for small royalty free tool clipartLarge Plastic Too Box  
*These are cheap and you can find these at garage sales.  I keep a lot of sewing tools in mine, and within reach of my sewing machine.  They usually have a carrying tray that can be moved to the sewing machine when needed.  I also use this box to pack my sewing supplies and tools for classes and retreats.

Gladware plastic bowls with lids (the larger ones)
*Store your larger notions in these—there are great for purse hardware, small tools, etc.

Zippered bags (old cosmetic bags)
*Great for keeping your scissors/shears in one place, pens, markers, highlighters, etc.

Ziplock bags
Image result for small royalty free ziplock bag clipart*When putting together a “kit” for a project, these come in handy for storing all of what you need with your fabrics and interfacings together as a kit.  When I get home from a shopping trip, I organize my purchases into kits and pin my baggie to my fabric so I don’t have to hunt for all of the small items I will need to complete my project.

Elastic hair bands
*These are great for binding those “wild things” like your tape measure, cording, piping, etc.

Binder clips
Image result for small royalty free binder clips  clipart*See No. 9.


See what kind of creative organizational tools you have around the house!

Friday, April 10, 2015

Want to win this bag?  Like us on Facebook for a chance to win!  Once we reach 300 likes, we will have a random drawing.

Go here:

https://www.facebook.com/BeaserBags?ref=bookmarks

Click Like.  And that's it.

This is a Della Wallet by Swoon Patterns.  Great for summer book fair, lounging by the pool, or shopping at the Saturday morning Farmer's Market!


Thursday, December 18, 2014

Visit my Craftsy.com pattern shop to download the free Luggage ID Tag Pattern.  This project is  super easy and quick to complete. A great gift for men and women, and can be made with vinyl, leather or fabric scraps.


http://www.craftsy.com/user/6028056/pattern-store?_ct=cx-buvjdql&_ctp=my-pattern-store,manage

Friday, December 12, 2014

Tips for Beginners working with intermediate/advanced patterns

As a beginner, it is imperative to practice your skills before starting any project. But sometimes, we just want to dig in and make something pretty!  Here are a few tips to dig in.  Find a project that you like and purchase the pattern.
    *Find and purchase a pattern that you want to make.   Patterns come in commercial brands (McCalls, Butterwick and Simplicity are the most reliable and correct and easy to follow commercial brand patterns) or designer brands (various pdf or paper pattern versions).  Note:  if you purchase a pdf pattern, be sure to follow the printing instructions.  There is usually a test square.  Print that page first and make sure your settings are correct.  If you print square is incorrect, the rest of your pattern pieces are also incorrect.

*Read through ALL of the pattern first, including any pattern language you do not understand.  Use resources (see below) for clearing up anything that you do not understand

*Purchase all of your materials, notions, and project supplies (purchase extra fabric, just in case you make a mistake cutting).

*Purchase inexpensive fabrics and notions, and practice the techniques contained in your pattern instructions.
    *Read twice (measure twice)/cut once.  Watch for special instructions, such as PLACE ON FOLD, cut 1, cut 2, extra fabric needed for one way design, etc
    *Take your time!  Cut out your pattern pieces, following any instructions given to attach your pattern pieces together (where necessary).  Some pdf patterns are printed on standard sized paper, and some pieces need to be taped together.  Follow the attachment instructions (tape lines, etc.)
    *Purchase good thread.  It is well-worth the cost.  Cheap thread creates a lot of lint and will tend to break—often. 
    *Before beginning your project, make several bobbins so you can quickly refill your bobbin case if a bobbin runs out.  As a rule, I make 5 bobbins for each project.
    *Purchase the correct interfacing, fleece, etc.  These types of materials are numbered on the bolt to help identify what type each is.  When you visit the fabric store, bring slips of paper and safety pins with you, and label each piece as the clerk cuts your purchase.  This will reduce confusion when you get ready to cut out your pieces.
    *Once you begin sewing your project, do it one step at a time.  Follow your pattern one step at a time and take your time. 
    *Take breaks. Put on your favorite music.  Have a cup of coffee or glass of wine—enjoy yourself!
    *Keep your seam ripper handy and carefully rip out seams that are not professional.  
    *Make sure your iron is clean and you have a good ironing surface or clean ironing board cover.  Purchase some cleaning paste for your iron in case you need to clean your iron.  Anything that is on your iron plate will get onto your project.  Once it melds into your fabric, your project is ruined.  This paste can be purchased at Walmart, usually in the laundry detergent isle. Never scrub your iron plate!
    *Make a “test” project from cheap fabric first.  You can work out all of your misunderstandings without any regrets!

    *Just go for it—try it out.  If your project is a flop, learn from your mistakes and try again.  You will succeed eventually!  There are no mistakes, just opportunities for creativity (a quote from someone but I cannot remember who).
    *Most importantly, don’t rush to complete your project.  Enjoy the process and you will enjoy the results. Have fun!
Sewing Help Resources
·       You Tube videos
·       Fabric Stores (ask the employees for advice; most are very knowledgeable)
·       Contact the designer of the pattern for clarification (most are happy to help)
·       Facebook—join a sewing group related to that specific pattern designer.  Also join groups for people who love to sew—these are great places to ask questions and get help. 
·       Sewing guilds—join or visit a sewing guild meeting.  There are usually plenty of men and women who love to teach beginners new skills and advance their newly developing skills.
·       Get a group of new sewing friends together.  You will be delightfully surprised!  Everyone has a different set of skills and sewing knowledge to bring to the “sewing table.”
·       Check your local library for free sewing classes, contacts for sewing help within your community, and books! 
·       Your bookstore (online and the store) has plenty of resources for honing your sewing skills.


Great Sewing Websites for All Sewing Levels


Like my Facebook page to learn how you can enter to win a kit to make this wonderful project!


https://www.facebook.com/BeaserBags?ref=bookmarks

Tuesday, December 2, 2014

The Tuck N Roll jewelry bag is ready for pdf instant download. Please visit my Etsy Shop to purchase.

https://www.etsy.com/shop/BeaserBags?ref=search_shop_redirect


Thursday, November 13, 2014

Creative Fabrics & Notions

Fabric and quilt stores are not the only places to find really nice, high quality fabrics, handbag hardware, and sewing notions.  Garage sales, estate sales and thrift shops are are a girl’s best budget friend.  Here is a short list of things you can find:

Old or Broken and Outdated Purses, Handbags and Gym Bags
What to look for:  good hardware that you can take apart and reuse, straps, reusable snaps, decorative pieces, zipper pulls, zippers, canvas for linings, good bag linings that can be reused, leather or faux leather pockets.
Outdated Men’s Leather Jackets/Faux Leather Jackets
There is usually enough leather on a large man’s jacket to make a nice purse, tote, or bag.  Carefully cut off any sewn areas and salvage large pieces of the leather and the lining.  Also, save the buttons, and zippers if there are any zippers.

Linens (Sheets, Pillowcases)
Use for linings, baby clothes (Christening gowns), gift bags, and any other project that calls for a delicate fabric.  Look for lacy or handworked or machine embroidery pieces to sew special gifts.

Outdated Wedding Dresses
Use for charity projects, such as making burial gowns for infants, create beautiful bridal bags, reuse beading and tulle, strip the lace for projects, and use for bag linings.  You can also make special bridal pillowcases for the bride  to use the night before her wedding day (silk pillowcases keep your hair nice and neat!) or a gift for a friend in the hospital.

Tablecloths
Rather than purchasing oilcloth (which is a plastic coated fabric used for lunch totes, lunch tote linings, etc.), pick these up for pennies!  They are usually large enough to cover a large dining room table, so there is a lot of fabric in one large piece.

Curtains
High quality curtains (especially) custom made curtains, can be cut up and unhemmed with plenty of fine materials for creating nice bags, pillows, smaller curtains, or cushion covers.  Don’t overlook the outdated prints, because those can be used as linings or making “fittings” (a practice run on a project you intend to make with some expensive store fabrics).

Old Uniforms
Lots of uniforms come with decorative pins, hardware, and fobs that can be taken apart and used on other projects.  Old military uniforms make beautiful and sturdy duffle bags, travel bags, and purses.  This type of canvas lasts many years.  Make sure that if you are using military wear, remove ALL stripes, pins, badges, etc. out of respect to the person who owned the uniform.  Also remove any identification of the branch of service—what you want is the fabric—not the identity (please be respectful). 

Old Sweaters
Make your special pooch a warm sweater using old (people) sweaters.  Free patterns can be found online.  Be careful about particular sweaters that have a high tendency to ravel.  You can also cut these up and hand “knit” them together with a needle and thread to make patchwork blankets.  (I may have to make one of these myself!)

Fleece Blankets/Old Quilts
Use these (instead of batting) to make baby quilts.  Make sure you have them cleaned well and that they are in reasonably good condition. 

Old/Outdated Clothing
What to look for:  nice buttons, zippers in good condition, reusable pockets, nice trim, etc.

Prom Dresses/Bridal Wear
Cut up and use for linings for all types of bags.  Either silk, brocade or polyester works great for linings.  These items also make beautiful remade bridal bags using metal bag frames.  Reuse any decorative accents on these dresses, also, such as beading, zippers, rosettes, etc.  Here is a link with a beautiful metal frame bag:


Decorator Fabric/Decorator Swatches/Decorator Placemats
Decorator fabric is a heavy duty fabric such as that used on upholstered furniture and pillows.  Swatches come in large pieces and are sometimes freebies. These can be used for bags, and metal frame clutches as well.


Jewelry Finds (broken and not broken)
Jewelry and trinkets can be used for pretty zipper pulls for cosmetic bag zippers, jacket zippers, etc.  Here’s a great link to show you how to use jump rings, tools and jewelry finds to create beautiful and decorative detail to your sewing projects:


Be creative!


If you have some great ideas about fabric and notion finds, please email me at beaserbags@gmail.com.  I would love to hear from you.


Wednesday, October 22, 2014

Essential Sewing Tools & Equipment   


Image result for scissors clip art royalty freeTools are an essential part of learning to sew and sewing in general.  With the right tools for the type of project you are working on, you can complete a nice, professional project with ease, and have fun in the process.  Here, we will discuss the most practical and necessary general tools (in my opinion), needed for most projects.  I’ve also starred generalized cost/prices usually paid for these types of tools in a fabric or department store from low (*) to high (****) prices. 

With the exception of a really GOOD pair of fabric scissors, you don’t need to spend a lot of money on tools.  Some sewing tools can be purchased at garage and/or estate sales.  Old does not necessarily mean bad (unless the tool is rusted—don’t buy rusted sewing tools!).

Scissors (Shears)****

Fabric Scissors—A good pair of scissors (correctly known as shears) is essential for getting precise and neat cuts.  Keep your scissors is its case/sheath when not in use and use them ONLY for fabrics.  Have them sharpened by a professional as needed.  I own a pair of Gingher 8-Inch Knife Edge Dressmaker's Shears which I purchased in 1986 for my mother to use to sew my wedding dress.  (This was the only way I could get her to sew it!)  These scissors still look new and cut like a razor.


Paper/Interfacing Scissors*—I purchase these at the Dollar Store or Walmart.  Use a permanent marking pen and mark these PAPER/INTERFACING.  They will become dull quickly.  I don’t pay to have these sharpened.  When they become too dull for the sewing room, I use them in the kitchen for herbs, packages, etc.  I use them in the kitchen until they become so dull, they are dangerous, or they rust or break.  At this point, they go in the recycle bin.

Thread Scissors/Snippers**—these are not necessarily essential, but once you have a pair to keep handy for those small threads, you will be happy you have them.  They are pointed and small, and can cut thread right down to the end, close to the fabric.  Have these sharpened by a professional to keep the points sharp.  I don’t keep these in a sheath since I use this pair all the time, however, it is important to be careful not to drop them because they are very sharp, and you can break the tips off or injury yourself or your pets or children who hang around at your feet while you sew (or drop things).

Tape Measure*
Your best friend!  These come in tape form or a mechanical form (which automatically retract when you push a button).  I recommend having one of each. I have a set in my purse and a set at home.  I’m always ready to measure something! The mechanical version is usually only a yard long, which is great to keep in your purse for fabric store trips, confirming pattern piece measurements, etc.  I keep my tape corralled with a hair clip or binder clip.  You can get these free at quilt shows and hardware stores, sometimes.

Pins & Needles
Safety Pins*—all sizes.  Useful for inserting elastics, holding down things while you sew other things, and securing buttons with posts that cannot be washed or dry cleaned. 


Quilting Pins**—better than those short, stubby pins with no heads.  These pins are long, thin and easy to work with.  They are a bit more pricey than regular sewing pin, but well worth the cost.

Sewing Machine Needles***—Purchase high quality sewing machine needles in various sizes and for various purposes.  Always keep a supply of needles on hand.  You can find tons of needle charts online FREE.  Print one out and take it shopping with you.  As a beginner, print several copies, and place one copy in each of your patterns and attached to your tutorial.  When you go shopping, you have all the info you need as part of  your shopping list.  My favorite brands are Schmetz and Organ.  They are universal needles and do not easily bend or break.  Organ needles are suburb for serger machines!

Hand Stitching Needles*
Most of my students refuse to sew by hand.  One day, and one day soon, you will need to sew by hand.  Learn how and learn well!  Get a set of hand sewing needles and get used to it!  A cheap set of needles is all you need.

Corner Tool*
A dual purpose tool, with one end pointed (great tool for poking out corners) and the other end odd looking—usually with a large missing gape (used to help lift up a button to easily sew onto fabrics).  Some are wooden and some are plastic. 

Loop Turner*
Loop Turners come in a couple of different styles:  a long metal wire with a hook on one end and handle on the other; and a hollow tube with a plastic stick-type tool.  I like the metal wire version.  These are fairly easy to use after you get the hang of it, and makes easy work of turning long, skinny tubular fabric pieces right side out.  It is actually  kind of fun to use.

Bobbins*
Purchase the correct bobbins for your make and model sewing machines and create a good, even, full bobbin.  Your life just became more enjoyable.  I make several bobbins at once so I won’t have to stop to make one mid-project.

Thread**
A high quality thread will never fail you.  Enough said!

A cheap thread leaves lint in your bobbin area, all over your project, and tends to break easily.  Not good.  Ever.


Always read your pattern and/or tutorial under the Tools & Notions section to survey whether or not you need to purchase additional tools.  Some tools can be substituted with things you may have around the house—be creative!  A tool box, kitchen utensil drawer, junk drawer, makeup drawer, etc. is a great hunting ground for neat and inventive sewing tools!  For instance, if you have skewer sticks, you can use these in place of a corner tool. 


Have fun and Happy Sewing!